Blog

LabVIEW: Getting started with LVOOP

I have been trying to get a handle on LVOOP for many months now but have been battling to get the concept into my head. I understand the concept of OOP, or at least I think I do, but really battling to convert that into the LabVIEW world.
Here is a list of resources that I used to try and figure it out:


There have been other articles that I have used, but none that I could find started from a blank project to build a basic application. 
 
So I set about to try write one from scratch. I used the example from the video of a Mammal Parent class with a few Child classes. Here is the UML diagram of what I had planned. I found a great online tool to create the UML diagrams. Have a look here.
 
As can be seen from the above diagram, I have a project with five classes, each has Dynamically Dispatched vi’s and one has vi’s for Data Member Access.
 
So that is the idea of my simple program, here is a step-by-step list of what I did:
 
Create a blank project and add five virtual folders. Add folders with the same names to the project directory on disk.
 
Create main.vi which will be your application.
 
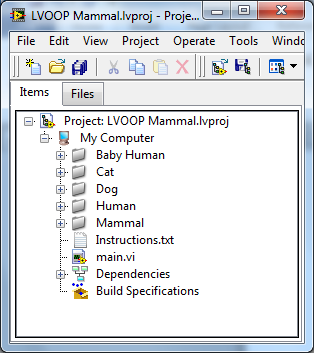
Create the Mammal.lvclass inside the Mammal folder.
 
Save the class in the Mammel folder on the disk. 
 
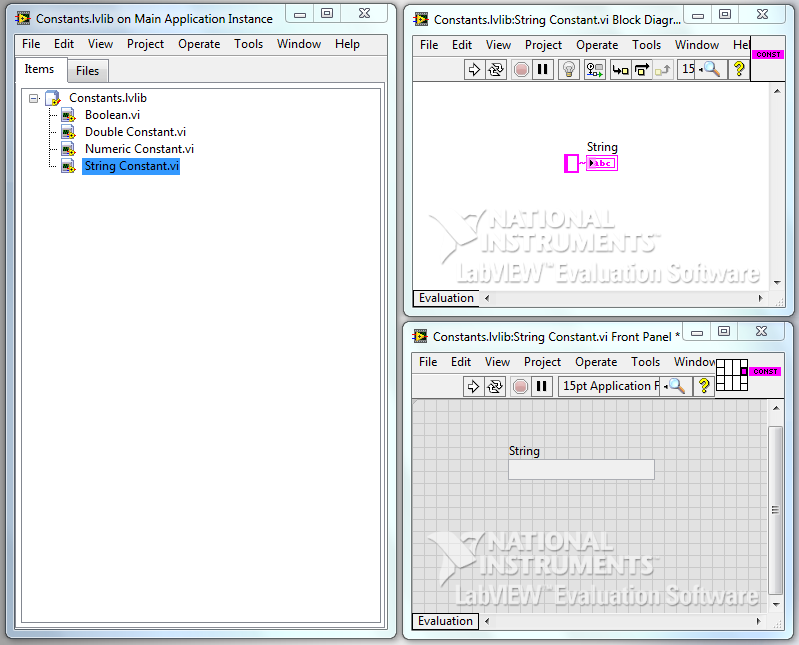
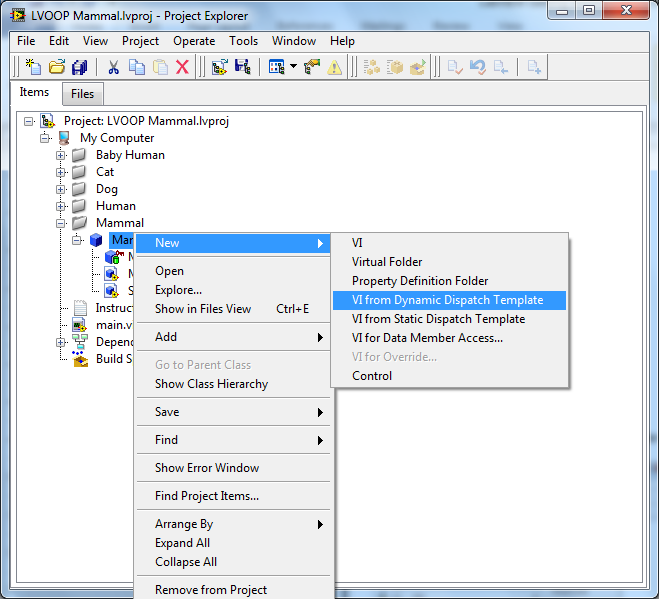
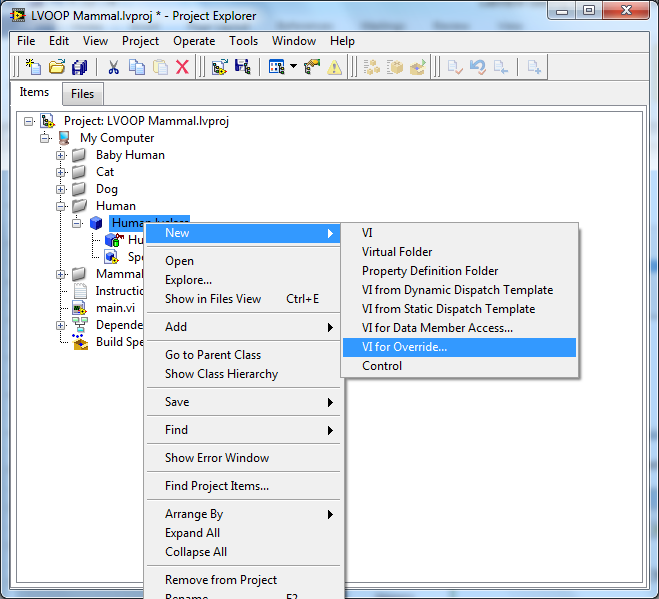
Next you need to create the methods for Move() and Speak() using the Dynamic Dispatch Template.
 
Add a blank string indicator and wire it to the connector pane. Do this for Move.vi and Speak.vi.
 
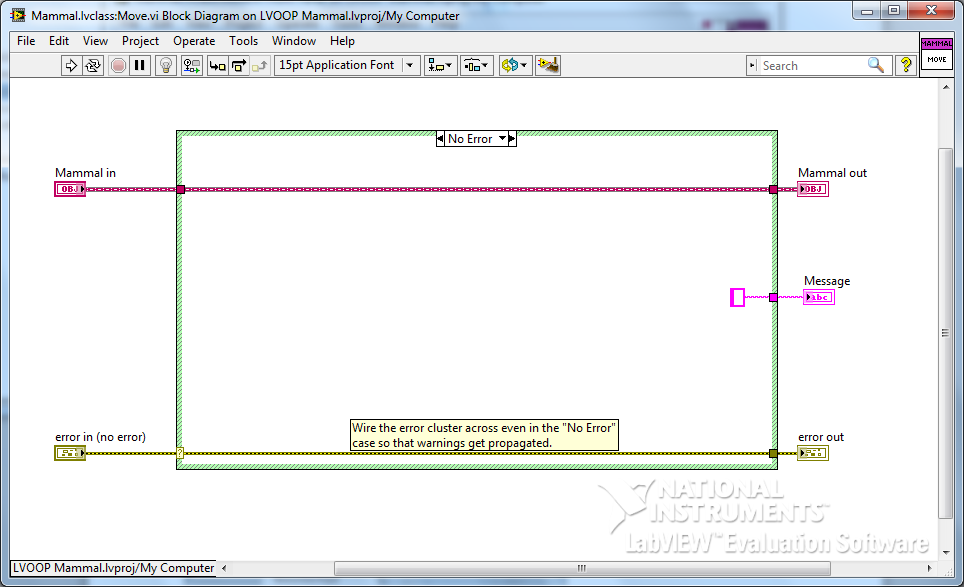
You have now created the Parent class with two methods that can be overridden by the Child classes.
 
The next step is to create the Dog, Cat and Human classes that will inherit from Mammal class and the Baby Human class that will inherit from the Human class.
 
Dog, Cat, Human classes:
 
Create the new classes and leave the control blank. Save the classes to their folders that have been created on the disk. Then edit the Inheritance settings in the class properties dialog. Each class needs to inherit from Mammal.lvclass.
 
Create a ‘VI for Override’ vi for Move and Speak. Edit the block diagram for each to look like this. In total three extra Speak and three extra Move vi’s should be created. One each for the Dog, Cat and Human classes.
 
The string constant in the No Error case gets changed for each method. This is the string that will be displayed in the main application.
 
Baby Human class:
 
Create a new class called Baby Human.lvclass and set it to inherit from Human.lvclass.
 
Open the ‘Baby Human.ctl’ control and add two strings to the cluster. Name them Movement and Voice. By adding controls here, we will be able to change the string that gets displayed at runtime. (Note that the Movement and Voice was hard coded in Dog, Cat and Human)
 
Next you need to make four vi’s for Data Member Access. These vi’s will be public and used to read and write the private data.
 
Select ‘Read and Write’ for Movement and Voice. Edit the icon for each if you want and then save the created vi’s.
 
Next you need to create the vi’s that override the Human Move.vi and Speak.vi. Follow the steps above to create ‘VI for Override’. They should look like this.


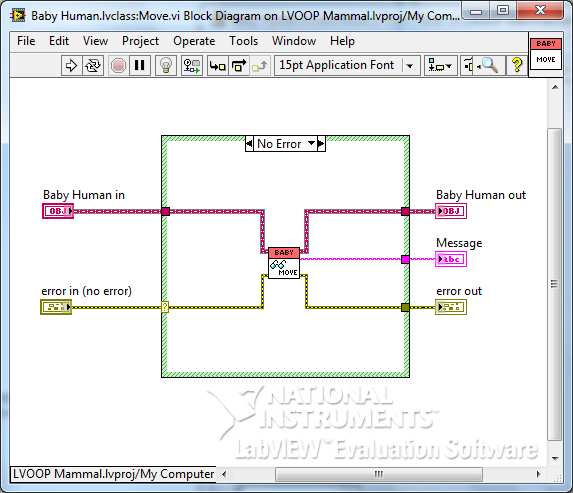
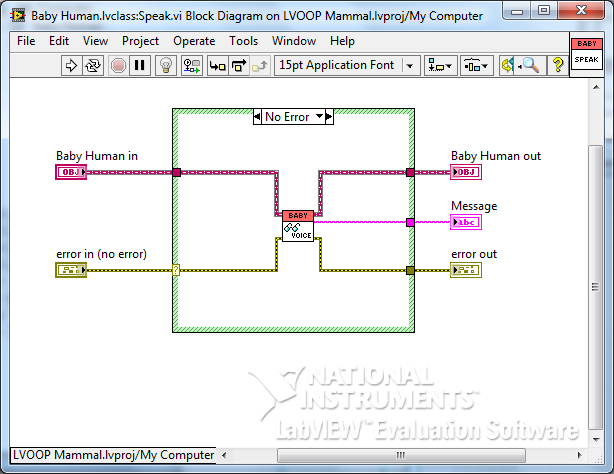
All of the above steps should set up the classes that are needed to write main.vi. I am going to write a simple application which creates an object of each class, builds an array and then displays each Move and Speak value in a For Loop. When we add the Baby Human class, we need to Set the values for Movement and Voice before we bundle the array.
 
For each object that gets passed into the For Loop, the associated Move and Speak method will be dynamically called. 


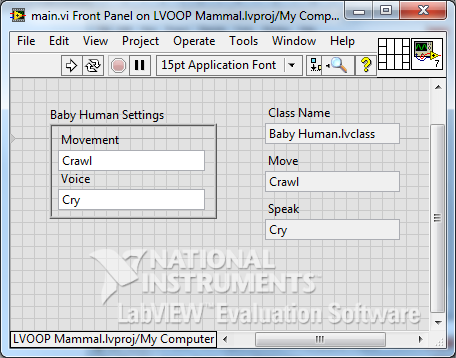
If you change the Movement and Voice of the Baby Human class on the front panel, that change will be displayed when the application is run. 
 
After going through this exercise I think I am starting to get a better understanding of LVOOP. I have a very long way still to go, but I now feel that I am at least on the pathway. I hope this has made sense and is able to help someone getting started. 
 
If I made mistakes, please leave a comment so that I can correct it.
Greg

LabVIEW: Creating Custom Templates and Sample Projects

The new ‘Create Project’ feature added to LabVIEW 2012 is great and I use it a lot when starting a program. However, I found myself making common changes to the templates before I started writing a program. The main changes were removing the ‘Something’ buttons and events. This isn’t a lot of work but does take time and becomes rather tedious.
 
One solution is to use the Create Project feature with a custom template. It is rather easy to set up and works really well after getting over a few minor hurdles.
I started off with creating a new QMH project from the default template. I made a few changes to the project and then saved the project how I wanted the template to work.
Some of the changes that I made were:
  • Removing the Something and Something Else buttons, events and cases
  • Changed the queue message from a String to a Type Def Enum. This makes the Consumer case a lot easier to set up and eliminates spelling mistakes
  • Added a case to read in a configuration XML file
  • Replaced constants with variable constants
  • Remove the Stop button to use the ‘X’ to stop the program


Once you have the template set up, save the project and close it. Navigate to the ‘LabVIEW Data’ folder in ‘My Documents’. Inside this folder, create new folders with the following structure. 
–ProjectTemplates
      |–CategoryOverides
      |–MetaData
      |–Source
 
Place your template into the Source folder. Make sure that Auto Populating Folders is DISABLED in the .lvproj. This caused me a lot of troubles getting set up.
 
The next thing to do is create an xml file in the MetaData folder. Call this file TemplateMetaData.xml. I used the default xml file as a template to get started. This is what my file looks like:

To get an explanation on the different keywords, have a look at this white paper from NI.
Once you have the xml file saved in the MetaData folder and the template project in the Source folder, you should be ready to go.

As can be seen from above, my custom project is now added to the Create Project wizard. Just follow the normal wizard to create a new project and get programming right away.
 
The main problem that I ran into was setting my folders to auto populate in the template. Once I switched that off everything ran smoothly.
 
Have fun creating new templates and projects.
 
Greg

LabVIEW: Looking at constants differently

I have started listening to the LabVIEW podcast by VI Shots and am finding them really interesting. The last one I listened to was Five Tips to improve your LabVIEW Application with Fabiola De La Cueva. After listening to the podcast, I could relate to most of the tips and see where I was going wrong.
 
Then earlier this week I attended NI Days where I went to a presentation by LabVIEW Champion, Steve Watts and he spoke about the same subject. This triggered in my head that I should start to make an effort to create a set of rules for myself to stick to in all my applications.
 
So today I started by looking at constants differently.
 
This is from Fabiola’s presentation where she asks what is a constant?
As can be seen from the slide above, PI is a constant, the number of seconds in a minute is a constant but the number of flux capacitors in the DeLorean might change so is therefore not a constant. 

This means that using ‘constants’ in a program should be limited to ‘True Constants’ and ‘Variable Constants’ should either be wrapped in a vi or loaded from a configuration file.

Wrapping a constant in a vi and adding all your applications’ constants to the project makes them easy to manage and change if needed.
I have created a library which I will add to all my projects. This library will then be used as a template for the most common constants used in an application. I then make copies of each as needed, name them ‘xxx_constant.vi’ and use a comment in the application to indicate what the constant does.

I have tried to keep the icon colour the same as the default wire colour for each type making reading the application easier. You can get a copy of my library below if you want to have a look at it or use it.

The other method mentioned in the presentation is reading variable constants in from a configuration file. I have also tried this using an XML file which works well and is quick to implement. I will do another post with my vi’s I used some other time.

I hope this post has been able to help someone use better style. If I have done something wrong or not understood the concept properly, please leave a comment and let me know so that I can correct it and learn better style.

Greg

LabVIEW: Certified LabVIEW Developer exam

After months of preparing and wondering when I am going to get to write the National Instruments Certified LabVIEW Developer exam, I managed to get back to the UK and into the September exam.
I felt really confident going into the exam, but a little nervous not knowing what to expect. The program I had to write was similar to the example questions with a few added twists thrown in. Doing the LabVIEW Core 3 course helped a huge amount.
I walked out of the exam rather unsure what had just happened. The first two hours went rather slowly and I thought I was doing well. Then the next two hours flew past without me even realising it. I managed to get to a natural break with about 15 minutes to go. I hadn’t finished all the required functions, but what I had worked as it should so I decided to stop adding more functions. Then I spent the last 15 minutes cleaning up my style and making sure that all the code was commented. This is where most of the marks come from so I wanted to make sure I got them.
I walked out the exam not really knowing what to think. I hadn’t finished the entire program which was a disappointment, but I knew what I had done worked, looked good and was commented. All I could do now was to wait. 
Four weeks later and then email I had been waiting for arrived. I opened it and saw that I had PASSED. So after months of practicing, weeks of nervous waiting, I can eventually say that I am CLD certified.
I am really grateful to everyone who helped me with advice and to National Instruments who presented amazing courses. The next step now is to find a job and get working. I can’t wait and am really looking forward to putting into practice the skills that I have learnt over the last few months.
Greg

LabVIEW and Raspberry Pi TCP/IP Communications

A few months ago I did the LabVIEW Connectivity course at National Instruments UK. I really enjoyed it but haven’t got around to trying any of the concepts out yet. Last week I decided to write a TCP/IP chat program working between LabVIEW running on my Windows laptop and Python running my Raspberry Pi.
On the left of the you can see the LabVEIW front panel running the server. On the right is the putty terminal running a Python client. At the moment I only have the functionality to connect one client to the server.
This little project got me thinking and I learnt quite a few new concepts.
LabVIEW Server:
I used the LabVIEW example finder to get started.
The LabVIEW server starts off my listening for connections. I have set a 60 sec timeout for this wait. Once connected, there are two parallel loops running. One loop is used to transmit strings and the other loop is used to receive strings.
To transmit a string, the user types the string in the User Input control and presses the Return key. An end of line character is then concatenated onto the string which is transmitted using TCP Write.
To receive a string, the TCP Read function listens with a timeout of 100 ms. If a string is received, it is concatenated onto the Response String indicator.
Python Client:
This is where things got interesting. I needed to use threads, timeouts and sockets, each of which I have never used before. This client was written in Python 3.2.

I ended up using two threads. One for the transmit and the other for the receive controls.

I used a global variable which is used to stop the threads when the client or server is stopped. I also needed to use a timeout in both the transmit and receive thread because the recv() and readline() methods blocked the program flow which locked up the threads if the client was stopped.

With the timeout set, I could monitor the global variable and return cleanly from the thread when the client or server was stopped.

First start the LabVIEW server, then within 60 sec run the Python client. The connection will be established and you will be able to send strings between LabVIEW and the Raspberry Pi. To stop the programs, either use the Stop button in LabVIEW or CTRL+C in Python. Both methods will stop both the server and the client.

I am sure there are many methods to do what I have done here, even better, cleaner ones. My Python is all self taught and only being used for my hobbies. I am using my Raspberry Pi for what is was designed for; learning. If you can recommend a better way to do this, please let me know because I am always keen to learn something new.

Greg