Adding C# Class Libraries into LabVIEW Applications

Knowing how to include C# libraries into a LabVIEW project can be a very useful tool. There are many reasons why you would want to include C# dll’s into a LabVIEW project but the two that come up most often for me is reusing legacy code that was initially written in C# and writing a C# wrapper when wanting to use a third party driver or library.

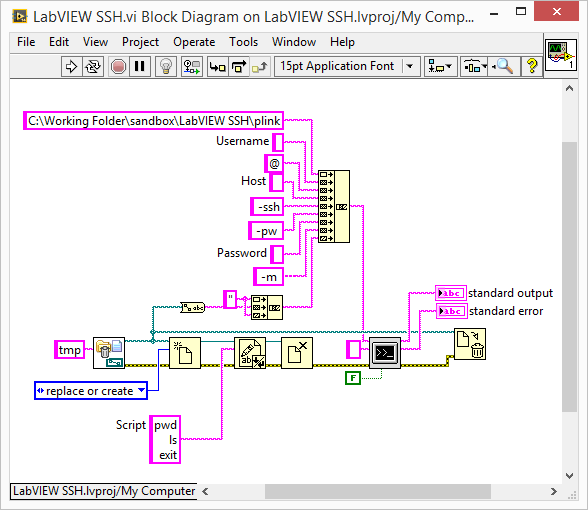
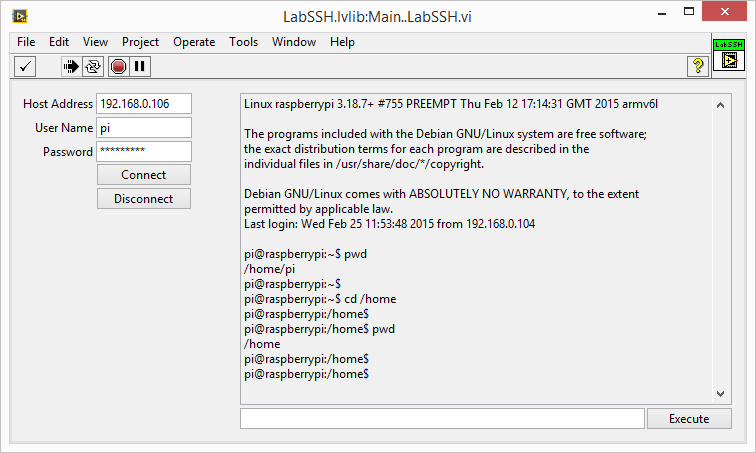
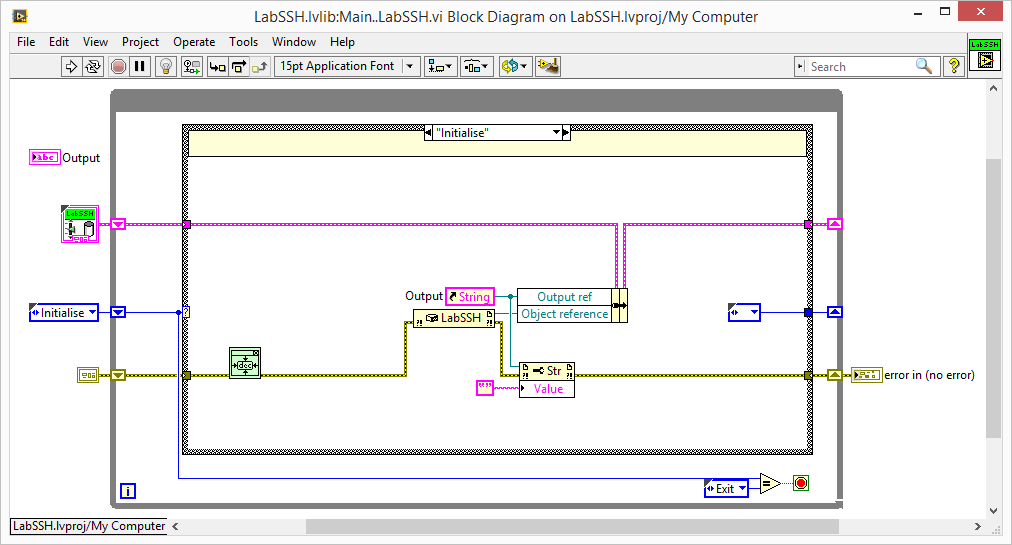
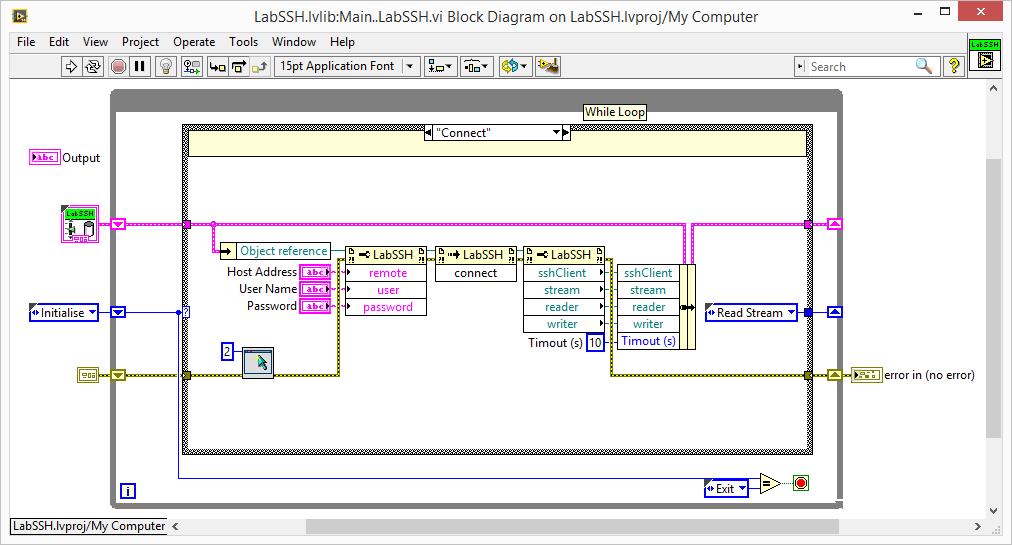
Sometimes it’s easier to write the wrapper in C# and then implement the library directly in LabVIEW. When interfacing directly to a third party driver/library, the LabVIEW code to accomplish a relatively simple task can be very messy and cumbersome to read; hence the C# wrapper with simple implementation in LabVIEW is my preferred method. This is how I made my LabSSH and LabSFTP libraries.

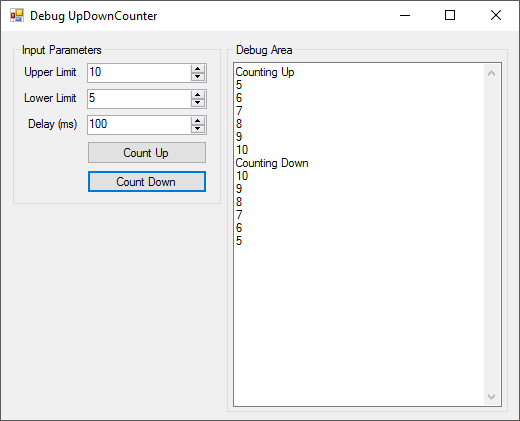
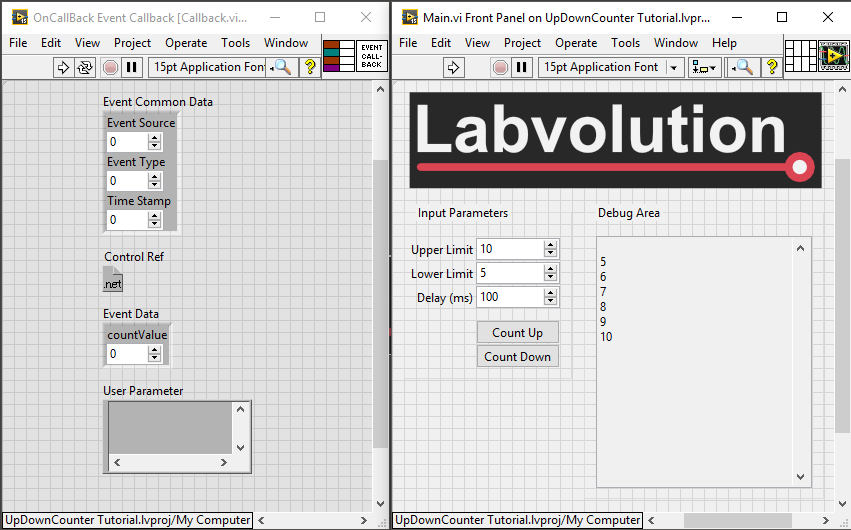
This post is going to cover the process of creating a C# Class Library, creating a C# Form Application to test the library and then finally how to bring it in to LabVIEW. The example that I have used is a very simple counter class. This class will either count up or count down between an upper and a lower limit. The delay between counts can also be set.

When the counter increments or decrements, the current value will be passed to the calling application (Form Application or later LabVIEW Application) using a callback event.

For each section I have created a walk through video instead of a formal tutorial. I find videos easier to follow and you can see the steps to follow a bit easier.

Please note the linked videos are not meant to have sound.

Creating the C# class library

First we need to cover some definitions:

  • Delegate – A delegate is a type that represents references to methods with a particular parameter list and return type. (Read the full definition here)
  • Event – Events enable a class or object to notify other classes or objects when something of interest occurs. (Read the full definition here)

Creating a C# Form Application to test the library

Adding a form application to your solution allows you to test the library in the environment that it was written. I prefer this to testing directly in LabVIEW as each time a new version of the dll is compiled, LabVIEW needs to be restarted.

By testing the dll in C#, you can get immediate feedback to your dll development. If there are problems with the dll when you move to LabVIEW, you know that the functionality is working so the problem is more than likely in the LabVIEW implementation.

C# LabVIEW Form Application

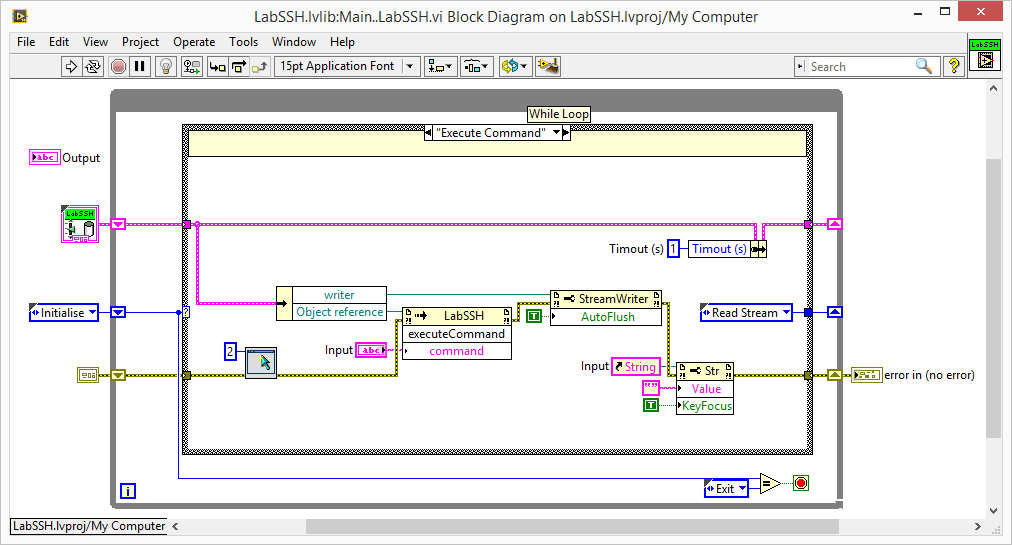
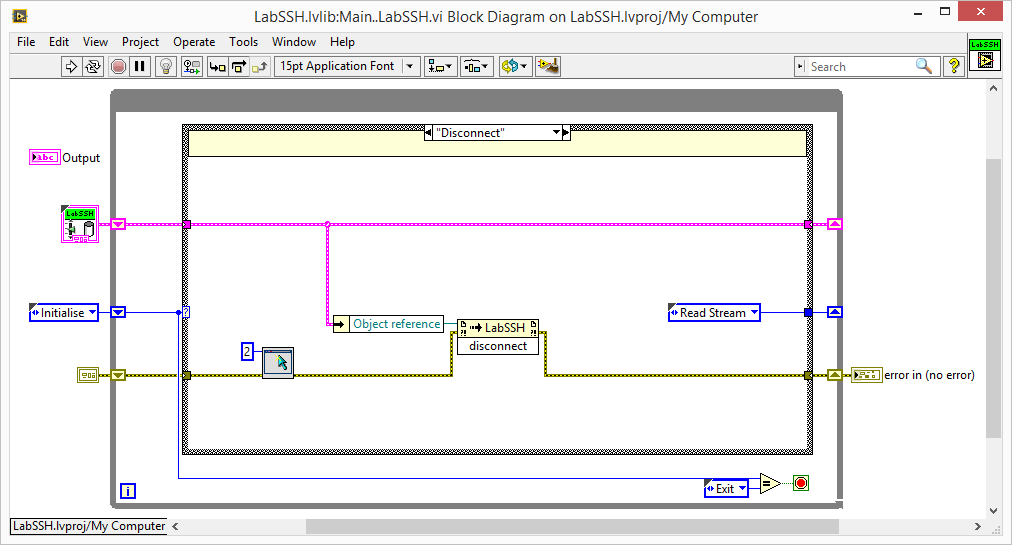
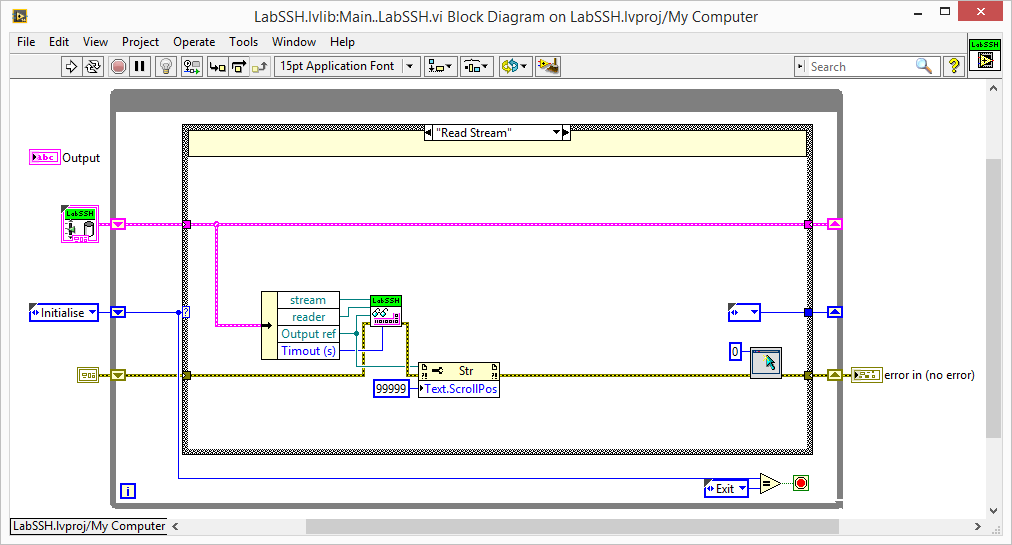
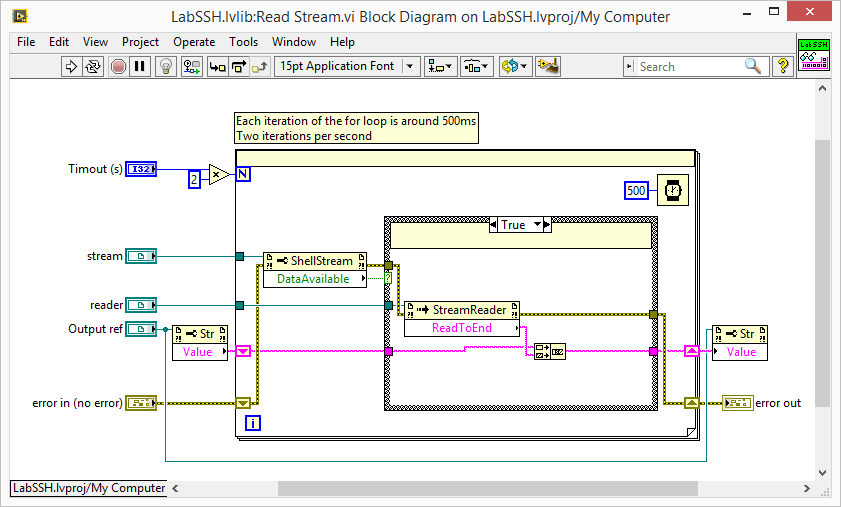
Implementing the library in LabVIEW

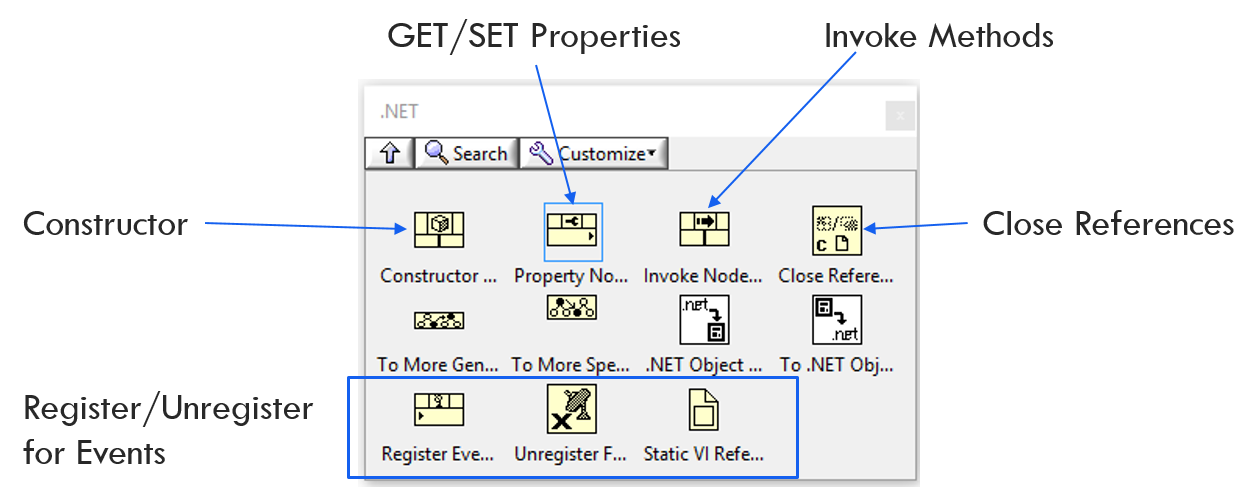
The .NET objects can be found in the Connectivity section of the functions palette.

LabVIEW .NET methods

C# LabVIEW Form Application 2

A common bug in LabVIEW is that the callback vi remains reserved for execution even once the references are closed, the event has been unregistered and the application has been stopped.

C# LabVIEW Callback Event Remains Reserved

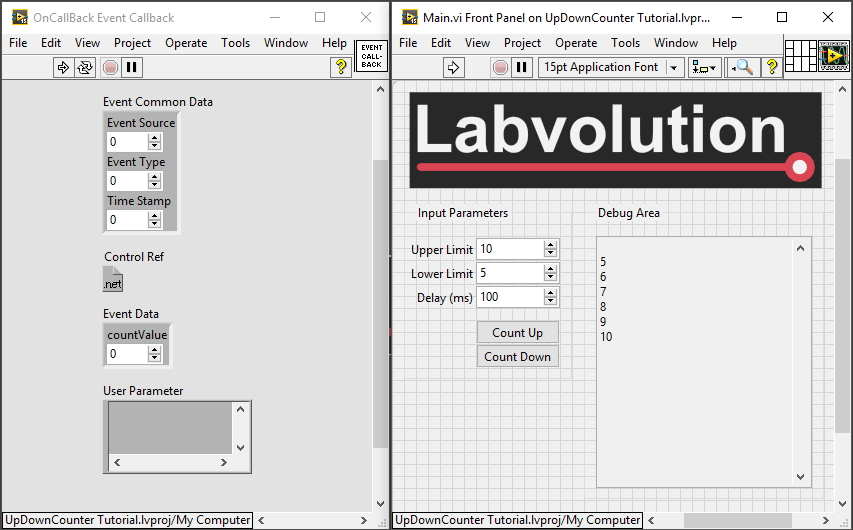
A way to get around this is to include an invoke node once all the references have been closed. Right click on the invoke node and select the following: Select Class >> .NET >> Browse >> mscorlib (4.0.0.0) >> System >> GC >> [S]Collect()

As soon as this method is placed on the block diagram, the callback event vi will no longer be reserved for execution.

C# LabVIEW Callback Event Cleared Reserve

In summary, this is a very simple implementation of creating a C# Class Library, testing it using a C# Form Application and then using the Class Library in a LabVIEW project.

You can download the C# and LabVIEW source below and as always if you have any questions, please get in touch.

Download LabVIEW and C# Class Library

Greg

SSH with LabVIEW

Please note that this project is no longer being supported and does not support some of the newer connection methods.

I was asked last week if there was a way to interactively communicate with a remote Linux client. The only way that I knew of was to create a temporary file with the commands and then use Plink (a part of PuTTY) to execute the file of commands on the remote machine.

LabVIEW SSH plink PuTTY

This works well when you want to execute a list of commands and are not interested in the response from each command. If you want the response from each command, then you will need to call this method for each command. This is not very efficient as each time this method runs, it will log in to a different session before executing the command.

This method will also not work if you need to run custom applications on the remote client where the session needs to stay in memory.

I did a bit of searching and didn’t come across any LabVIEW solutions that suited my needs. I did find a really good C# library that looked like it would work. It is still actively supported and the latest version is only a few months old. (All good so far)

As the library is massive, my plan of action was to use the library to write my own C# dll that would do what I wanted it to do. All that I needed my library to do was connect to a remote client, execute commands and return the response and then disconnect when finished.

C# class

I decided to put everything into a class so that I can add to it in the future. There are still a few features that I want to add but will leave them for another time.

connect()

You need to create the following objects that will be used by the various parts of the application.

  • SshClient – used to connect and disconnect from the client
  • StreamReader – this will be used to read what is returned from the client
  • StreamWriter – use this object to write to the remote client

public void connect()
{
sshClient = new SshClient(remote, user, password);
sshClient.Connect(); //connect to the client
stream = sshClient.CreateShellStream("dumb", 80, 24, 800, 600, 1024);
reader = new StreamReader(stream);
writer = new StreamWriter(stream);
writer.AutoFlush = true;
}

Once these references are created, they are stored in public properties.

executeCommand()

The execute command methods writes a string to the StreamWriter object.

public void executeCommand(string command)
{
writer.WriteLine(command);
writer.AutoFlush = true;
}

Once the string has been written, the buffer is flushed.

disconnect()

The disconnect() method closes the session and disconnects from the client.

public void disconnect()
{
sshClient.Disconnect();
}

The class only contains these three methods. There is one more step that needs to be taken and that is to read the StreamReader object for responses from the client. I have left this out of the class and leave it up to the application to do the reading.

readReader()

private void readReader()
{
try
{
int i;
for (i = 0; i < 3; i++)
{
Thread.Sleep(500);
if (ssh.stream.DataAvailable)
{
tbOutput.AppendText(ssh.reader.ReadToEnd());
tbOutput.ScrollToCaret();
Thread.Sleep(50);
}
tbDebug.AppendText(i.ToString());
}
}
catch(Exception ex)
{
MessageBox.Show(ex.Message.ToString());
}
}

In the readReader() method, I monitor the DataAvailable flag. I have had to play around with the number of iterations of the for loop as different tasks take different amounts of time. Some examples that I came across only call this method once, but I found that some data is then missed. Setting the iteration too high causes unnecessary delays and setting it too low does not allow all the data to be read. There are other methods that can be used, but I still need to give those a try.

Implementation in LabVIEW

UPDATE: I have uploaded a video of a LabVIEW application being used to to communicate with LinuxLite running in a virtual machine.

LabVIEW SSH front panel

My main aim was to get a LabVIEW application working so once I had my class written, I moved into LabVIEW mode and connected everything up.

Using the .NET palette, I was able to call the constructor, read/write properties and execute methods on the class.

LabVIEW .NET pallette

I wrote a simple state machine application to test the class. All the references are stored in a typedef cluster which is shifted around each state. On the front panel there are buttons that generate events to call each case.

Constructor and connect to client

LabVIEW SSH constructor
LabVIEW SSH connect

Execute commands on the remote client

LabVIEW SSH Execute Command

Disconnect from the client

LabVIEW SSH Disconnect

Read the StreamReader object

LabVIEW SSH readStream
LabVIEW SSH readStream 2

With this application, I am able to connect to a remote client, execute commands as I would in PuTTY and then disconnect when I am done.

There are a few things that I still need to sort out. The main one is that terminal characters are being returned. These are not seen in PuTTY as PuTTY removes them from the string that is shown. The other is that the prompt is being written twice. From what I have read this is caused by the client echoing what it receives. I still need to look at this too.

In future versions, I also want to add SFTP functionality. Being able to upload and download a file will be quite a nice feature. I also want to add different login options. Being able to login using private keys will also be useful.

As with all my posts, you can download the LabVIEW code. The download link contains a slightly modified library from the above post. If you have any feedback, please feel free to contact me on Google+ or send me an email. The LabVIEW application have been tested on the default Raspbian image running on a Raspberry Pi B.

Download LabVIEW LabSSH & LabSFTP Library

Greg

Adding source code to Blogger

I have been trying for quite some time to add source code to my blog. Just copying and pasting the code works fine, but there is no proper formatting or colours used in normal source code editors. After browsing the internet and reading many examples, I finally came across this website that helped me get it done.
I have used the SyntaxHighlighter script and from what I have seen, this seems to be the most used method. It supports a number of different programming languages and once set up, very easy to implement.
Please back up your blog before trying this as you need to edit the html template. From your Dashboard, navigate to Template, and then select Edit HTML. A warming will pop up so select Proceed. The HTML template will now be displayed.
Navigate down in the template to find </head>
Copy the code below and paste it above </head>


Preview your template to ensure that it still looks ok. If all is fine, then save the template and close the editor.
The next step is to make the script work. You do this by using the <pre> and </pre> HTML tag. In between these tags is where you add your code. You also need to specify which script to use depending on what language your source code is in. Here is the example I used to display C# source code.

private void UpdateCounter()

{

if (iCounter.Value < 50000)

{
iCounter.Value++;

{

}
else

iCounter.Value = 1;
}
}
You need to add the tags and code in the HTML editor. Once the source code has been added, then you can go back the the text editor to complete the post.
That’s about it. Once the template has been edited and your set up is correct, adding source code it pretty easy.
Greg