Raspberry Pi temperature profile using LabVIEW

Connected to my Raspberry Pi is a DS18B20 temperature sensor which I have mounted inside the case roughly above the processor. I wanted to map the temperature profile inside the case and have a visual representation of it. To do this I joined up a Python script, an SQLite3 database and LabVIEW.
I only have one temperature sensor connected and the RasPi doesn’t run very warm so this image is rather exaggerated. I’ll explain a bit more later.
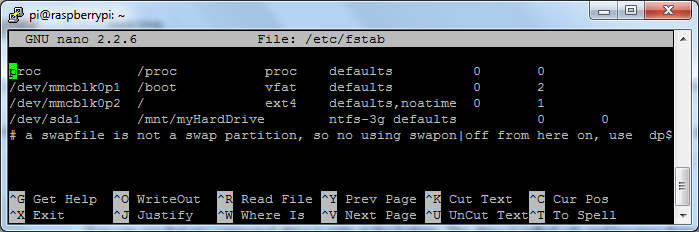
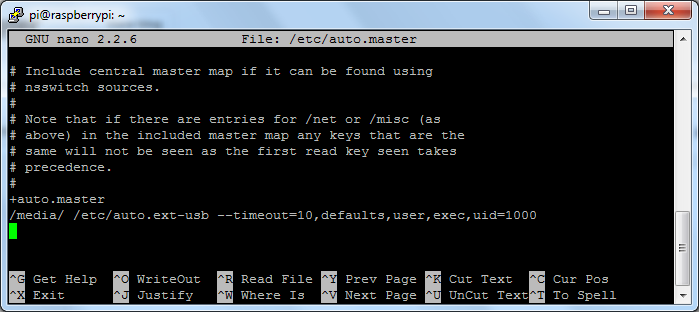
So I started off by writing a Python script that runs on my RasPi. It measures the temperature and then logs it to a SQLite3 database that I store in a shared folder on a mounted USB flash drive. I have accelerometer data in the database too, but that will be added a bit later.


That is all that happens on the RasPi. Next I wrote a LabVIEW program that queries the database over the network to get all the data. I need to do a bit of work on my query to just return the last line of data but that I’ll add in future versions.
To query the SQLite3 database, I used the this toolkit which works really well and is super simple to get set up. Once I have the temperature, I need to display it on in user interface. This is where Sensor Mapping Express VI comes in really handy.
All you need to do is point to your .stl file and select where you want to the temperature sensors to sit on the RasPi. I used this model which I converted using Google SketchUp. This is where I had to use four dummy senors to be able to show the temperature difference. I have set the outside 4 sensors to 0 degrees Celsius and only sensor 0 is getting the temperature from the database. With more sensors this can be made a lot more accurate. As I said earlier, this is just to prove a concept for now.
Every 100ms I query the database, build an array with the temperature data and then apply it to the Sensor Mapping Express VI. The temperature profile then changes according to the surface temperature of the RasPi.
Here are the colours that I used for my mapping:
Temperature vs Colour mapping:
0 Celsius R-0 G-0 B-255
21.25 Celsius R-0 G-255 B-255
42.5 Celsius R-0 G-255 B-0
63.75 Celsius R-255 G-255 B-0
85 Celsius R-255 G-0 B-0
I have already connected up an ADXL345 accelerometer which is acquiring tilt and pitch values, so my next step is to be able to move the  model in LabVIEW as I move my physical RasPi. Should be some fun for a few more hours.
If you want a copy of my code, you can grab it over below.
Please feel free to leave any tips, comments or questions below.
Greg

Route static files for BottlePy web framework

I have been using BottlePy on my Raspberry Pi for quite some time. I really like the simplicity of the framework and the ease at which you can get something up and running. The one issue I had, was that you could not load static css or js files. 
There are ways around this, like placing your files in Gist and linking to the raw code, but this can be an issue when you want to run your webserver ‘offline’. The documentation is not very clear on how to do this, so here is what I did to get it working properly. 
This is the template that I use to route the static files. This is part of my main python code that runs the server.
Then all you need to do is add your file names in the .tpl file. By doing this, your css, or js files can be stored locally so they can still be served if you are offline. 
That is about it. I hope this helps because I really find this framework great to use and works flawlessly on my Raspberry Pi.
Greg

Raspberry Pi: Direct connection to Windows 7

This is something I have been wanting to try for quite some time but never really found much info on how to do it. Well I sat down the other day to get it done and realised that it is MUCH easier than I expected.
My objective is to directly connect my Raspberry Pi to my laptop using an ethernet cable. In the next few months I am going to be away from a decent internet connection but I still wanted to do some work on my RasPi. So my Google searching started, finished and here is what to do.
The process uses a built-in feature of Windows 7 called Internet Connection Sharing (ICS). In a nutshell, you can use any Windows computer with more than one network connection, WiFi and LAN, and share the connection to other computers. 
Firstly you need to set up the settings on Windows. You need to go to the properties of your disconnected LAN connection and click on the sharing tab. Then check the box to allow other network users to connect through this internet connection.

The tricky thing to set up is the IP address that you are going to give the RasPi. You need to check the TCP/IPv4 settings under the Networking Tab. I picked an IP address and gave my RasPi a static address so that I know what it is when ever I use this connection.
Next you need to power up your Raspberry Pi and connect to it some way. Either use a WiFi connection that is already set up, an ethernet connection to your router or using the serial port on the GPIO.
You then need to set up the IP address by editing the interfaces file.

sudo nano /etc/network/interfaces

Change the part of the file that refers to your eth0 connection to look similar to below. You might have other settings in there like WiFi IP addresses and passwords but just leave those alone.

iface eth0 inet static 

address 192.168.137.184 

netmask 255.255.255.0

Once you have saved the interfaces file, send the shutdown command so that you can change over the connections. Once powered off, directly connect your RasPi ethernet port to your Windows ethernet port. You should be able to use both straight-through and cross-over cables. Now power up the RasPi.
Once booted up, you should be able to log in with Putty to the static IP address that you set above. 
And that is pretty much it. Another cool thing by connecting this way is that you should be able to power your Raspberry Pi from your computer USB port. This makes transport really easy as all you need is an ethernet cable and a USB cable to get up and running. 
Hope this helps and if you have comments or questions, please leave them below and I’ll get back to you as soon as I can.
Greg

Raspberry Pi: NAS server

I have been wanting to set up my Raspberry Pi as a Network Attached Storage (NAS) drive for quite some time. I eventually got a chance yesterday to give it a go. Unfortunately the Raspberry Pi USB port can’t power my external hard drive and I don’t have a USB hub at the moment, so I just used a 16GB flash drive.
First you need to format your external drive with NTFS. Then place a file on it. Any file will do. I chose a text document so that I can open it and view it on the Pi. Once you have set up your drive, turn off your RasPi, plug the drive into the USB port and then turn on the RasPi. It is safer to plug the USB in when the RasPi is off because some versions don’t have poly fuses on the USB ports.
Once booted up, log in and check to see if the drive is connected.
  • sudo fdisk -l

You can see that my connected drive is right at the bottom. The drive is called sda and because there is only one partition, it is called sda1.
Next you need to create a folder where your drive is going to be mounted into. I called mine myHadrDrive. You also need to give the folder root access so that when you connect to it you are able to read from it and write to it.
  • sudo mkdir /mnt/myHardDrive
  • sudo chmod 0777 myHardDrive
Next you need to mount the hard drive to the folder that has just been created. Open fstab and add the following line to the bottom of the file where it reflects your setup.
  • sudo nano /etc/fstab

Mount the drive
  • sudo mount -a
Now we need to install and set up the Samba server. This will allow a windows machine to connect to the RasPi over the network. Start by installing the following packages using apt-get.
  • sudo apt-get install samba
  • sudo apt-get install samba-common-bin
  • sudo apt-get install ntfs-config
  • sudo apt-get install ntfs-3g
Once all of those packages are installed, edit the Samba configuration file. It took me a while to get this right but with the help of this video, I managed to get it. 
  • sudo nano /etc/samba/smb.conf
Replace the entire file with the following:

#======================= Global Settings =======================
[global]
workgroup = WORKGROUP
server string = raspnas server
netbios name = raspnas
dns proxy = no
### Logging
log file = /var/log/samba/log.%m
max log size = 1000
syslog = 0
panic action = /usr/share/samba/panic-action %d
### Authentication
security = user
map to guest = pi
#======================= Sharered Folders =======================
[media]
path = /mnt/myHardDrive
guest ok = yes
guest account = ftp
browseable = yes
read only = no
create mask = 0777
directory mask = 0777
writeable = yes
admin users = everyone
#==========================================================

A few points to note:
  • WORKGROUP is the workgroup that the drive will be connected to
  • raspnas is the name of he drive on the network
  • path is the folder that you set up earlier
  • Change the file according to your setup
Lastly you need to restart the Samba service and add the user to the Samba database
  • sudo service samba restart
  • sudo smbpasswd -a pi
Now your Samba server is set up. You still need to do one last thing. You need to make sure that the drive gets connected at startup.
  • sudo apt-get install autofs
Add the following line to the bottom of the config file
  • sudo nano /etc/auto.master

Reboot your RasPi and then you should be able to log on to the shared drive using your Windows machine.
I hope this has helped anyone who was stuck. If you still have any problems leave a message in the comments and I’ll try help as best I can.
Greg

Raspberry Pi meets TI LaunchPad MSP430

A few weeks ago I got a TI LaunchPad. With the help of a few tutorials I managed to get the basic input, output and UART working. As most of the examples that I could find are for CCS, I decided to go that route instead of IAR.

My next step was to get my LaunchPad working with my Raspberry Pi via the USB port. After a bit of playing around and installing a few programs, I managed to get it to work. Below is how I got a program  written, compiled and programmed onto the LaunchPad from the Raspberry Pi.

First you have to install a few programs with apt-get.

$sudo apt-get install binutils-msp430
$sudo apt-get install gcc-msp430

$sudo apt-get install msp430mcu

$sudo apt-get install mspdebug

$sudo apt-get install msp430-libc

You might have to run

$sudo apt-get update

before installing the modules.

Next run mspdebug to make sure that there are no errors. If there are no errors type exit to close the debugger.

$sudo mspdebug rf2500

Now that you have everything installed, we need to create the program. I use nano text editor to write my program.

$sudo nano button_ISR.c

This program uses the two LED’s and one push button on the LaunchPad. When the button is pressed, an interrupt is generated and then the LED’s are toggled.

Close nano saving the changes.

The program then needs to be compiled.

$sudo msp430-gcc -mmcu=msp430g2553 -g -o BUTTON_ISR button_ISR.c

The program should compile without any errors and now you are able to run the debugger.

$sudo mspdebug rf2500

Now program the device

prog BUTTON_ISR

and run the program

run

CTRL+c will stop the program running and exit will close the debugger.

In the next post I will show you how to communicate between the TI LaunchPad and Raspberry Pi via hardware UART and the USB connection.

Greg