By default, Windows runs applications with their priority set to Normal.
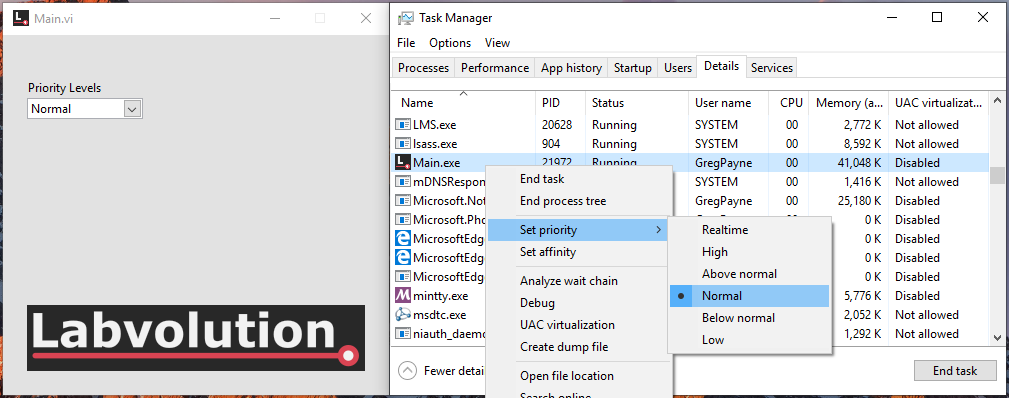
Changing this priority cannot be done from the LabVIEW build. Therefore, if an application needs to run with a specific priority, the priority needs to be manually changed each time the application is run.
This can be tedious as well as very easily forgotten about. Additionally, if a Realtime priority is required, an administrator account is needed.
There is a way to change the priority of an application using the Windows Management Instrumentation Command line (WMIC) utility.
wmic process where name='<application.exe>' CALL setpriority '<priority>'
| Priority Level | Priority Value |
| Realtime | 256 |
| High | 128 |
| Above Normal | 32768 |
| Normal | 32 |
| Below Normal | 16384 |
| Low | 64 |
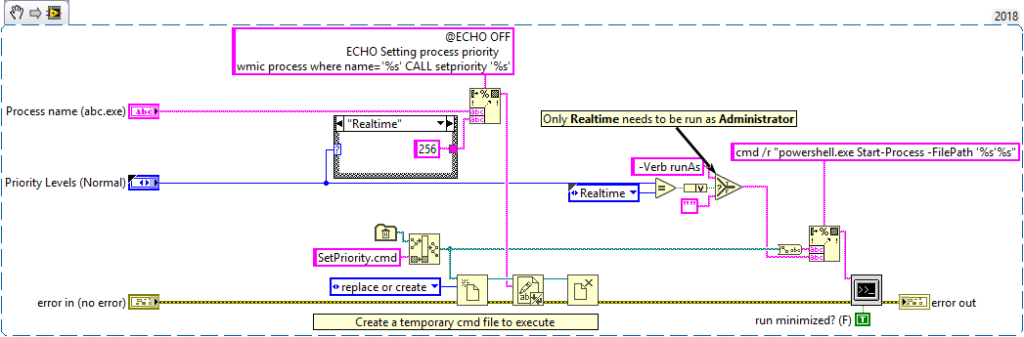
I have written a utility that can be run when starting an application which will set the priority automatically. As mentioned earlier, when setting a Realtime priority, the command needs to be run as an administrator.
Demo video changing the priority of an application.
I have only tested this on Windows 10 but should work on earlier versions. A demo application can be found here.
Update
I have been asked by a few people in the LabVIEW community if changing the priority for an application really makes a difference. Although I hadn’t done any benchmarking, from viewing the results from our particular application, I could say that it did make a difference; however I couldn’t prove it.
I therefore made a benchmarking application that simulates the way we are capturing data and why it is important to us to set the application priority. I can’t go into the details of the application, but here is a brief, simplified overview.
Application Overview
The application is running on a Windows 10 laptop and the system under test runs at a fixed speed (meters/min). Measurements are then taken at a fixed rate (dt). The measurement is recorded with an associated ms time. We need to capture a measurement at least every 5ms and
the distance is updated at a rate of around 1sec. The test will run for anything from 30 min to 3+ hours. In the post processing, we match time to distance and interpolate the missed distance measurements.
We had very short deadlines and all the equipment had been specified and purchased before I started the project. This introduced limitations which we had to work around; at least for this initial get-it-out-there release.
Benchmarking
To perform a benchmark I ran a similar timed loop 90000 times at a rate of 5ms. This 90000 loop execution was then repeated 5 times. This is almost the same process the test takes. The 90000 loop is repeated for the entire test. 90000 is an instrument limitation in that it can only store 90000 data points. In our test application, the measurement gets taken inside the timed loop.
These 5 loops of 90000 samples was then repeated for each priority. I only tested the three extreme cases. Normal which is the default run type, Realtime and Low.
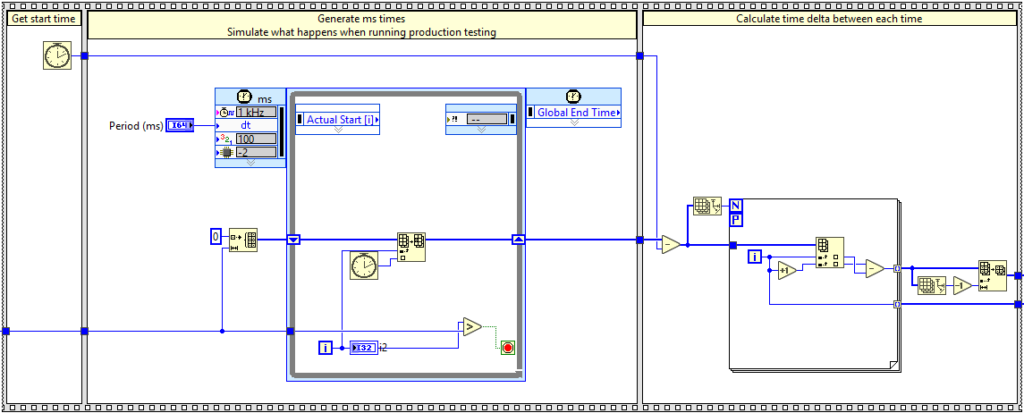
The three graphs below show 5 loops of 90000 samples running at a dt of 5ms. The numbers plotted are the delta time between each loop iteration. The time is taken from the Tick Count (ms) function as can be seen above.
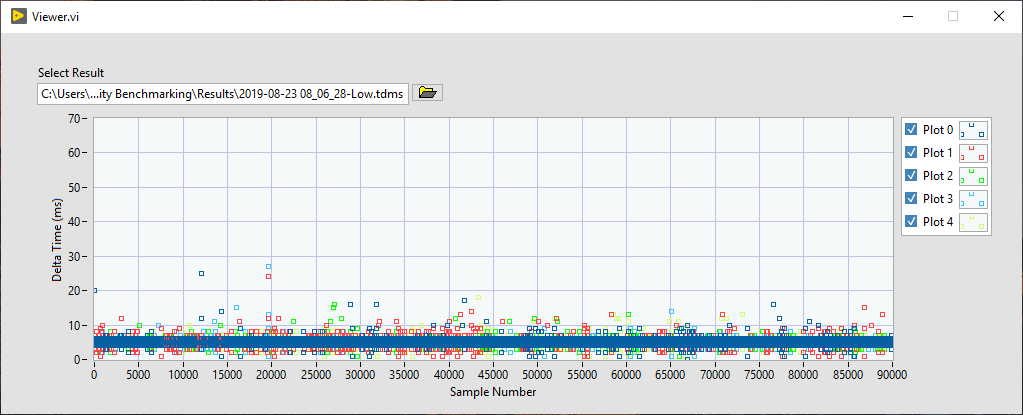
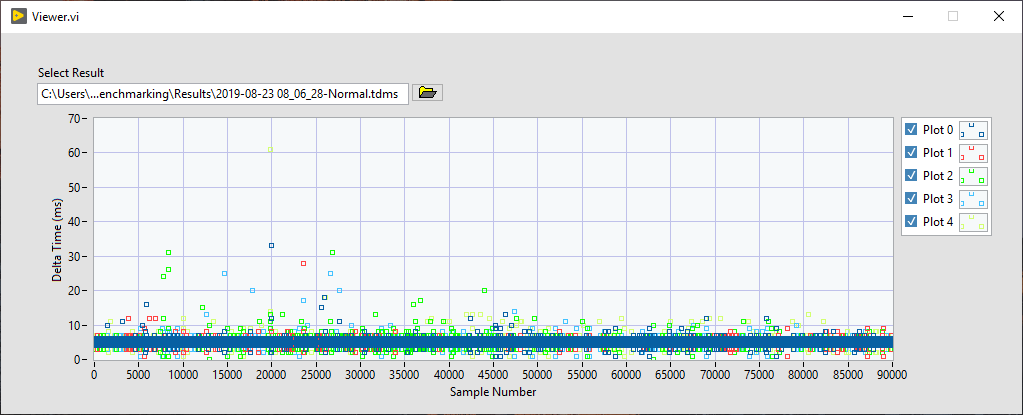
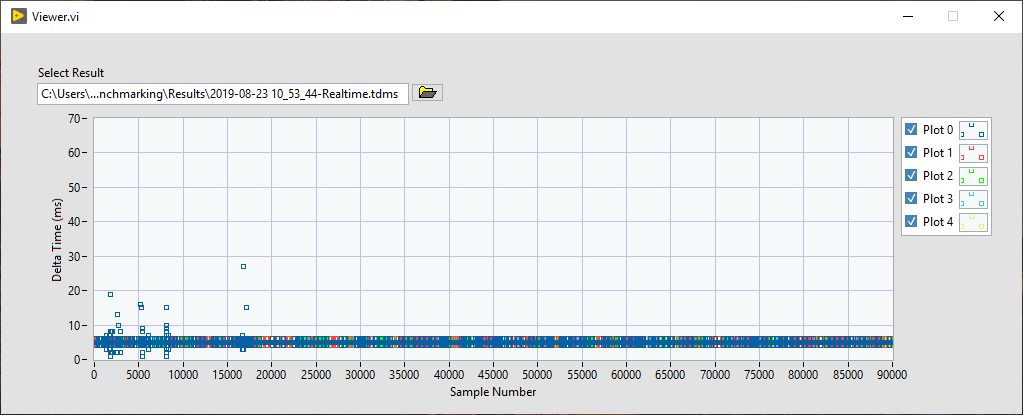
From the images above, it can clearly be seen that running with Realtime priority gives a better periodic result, even when running with a timed loop. As virtually nothing is being done within the timed loop, I assume all the variance in dt is down to something Windows is doing. When we analysed the real test results, the variance was a lot larger.
All the code is in a Bitbucket repository so feel free to clone it and have a look. The repository contains a submodule so don’t forget to update the submodule.
git clone --recurse-submodules https://bitbucket.org/Labvolution/priority-benchmarking.gitI hope this explanation is helpful. Get in touch if you have any comments.